-assalammualaikum-
Good morning all,
It's very cold today and very refreshing. I woke up a little late than I supposed to, about 4.40am, I'd plan to start my day at 3.30am, not that I'm an early riser, but that's the only time I can sew without being distracted by my kids, especially little Enaydia.
I had make a promise to post a tutorial yesterday on my fb status on how to make bellow pockets, my way, of course! I love bellow pockets, you can see my obsession on bellow pockets almost on my every bag collection!
So, while making the handbag/car organizer for my shop today, I'll show you how to make the bellow pockets. The neat version...haha...
This is a pictorial tutorial. Less instructions. I hope the pictures will guide you through the process, and click at the picture to enlarge it if you can't see clearly.
My tutorial showed here is how to make 2 pockets on 23cm wide bag body (add 1cm for seams allowance to all 4 corners).
* I use 1 cm for seams.
-For a 23cm (without seams allowance measurement) bag wide, you have to minus 1cm to create the pocket (23cm - 1cm = 22cm -pocket measurement, without seams.)
-From 22cm, divide it to 2 (since we're going to make 2 pockets) and you'll get 11cm measurement for each pocket.
-Now, look at the picture carefully. I'm drawing my pattern on an interfacing because I'm using soft English cotton. If you are using thick cotton/linen, there is no need to use interfacing, okay.
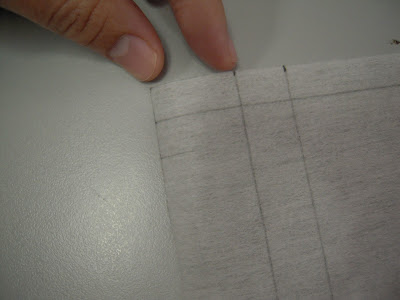 |
PICTURE 1
First, measure about 3cm-3.5cm. Notice that there is another line crossing those two lines?
That will be a seam line to sew the 2 pieces together. (in pic no. 9) |
 |
PICTURE 2
Now, measure 1.5cm, this will create the pocket depth |
 |
PICTURE 3
Measure 11cm here for the pocket |
 |
PICTURE 4
There are 4 columns here. Each column are measures at 1.5cm.
Oh, I've lost one pic here, after you create that 4 columns, measure another 11cm for pocket.
Remember, we are making 2 pockets here! |
 |
PICTURE 5
Another 1.5cm column |
 |
PICTURE 6
And another 3cm-3.5cm column |
 |
PICTURE 7
Cut 2 pieces for pockets. Same size. But, I usually cut another piece bigger because I don't want to waste my time measure the same thing all over again which I can do it easier later.
Will go to that later.
Notice here that the another piece was not interfaced. |
 |
PICTURE 8
Right side facing each other. |
 |
PICTURE 9
Sew on the seam. |
 |
PICTURE 10
Now, iron it flat.
I'm using a silk setting on my iron to prevent the interfacing from shrinking if the setting is too hot. |
 |
PICTURE 11
Fold at the joins and iron again. |
 |
PICTURE 12
Sew at the joining, I use the inner line of the footer to guide my sewing therefore,
I don't need to use zipper footer or smaller footer scale seam footer to sew near the edge. |
 |
PICTURE 13
This is how I guide the stitching using normal foot when sewing near the edge. |
 |
PICTURE 14
The stitching. |
 |
PICTURE 15
Again, using the footer as my guide, I stitch another line.
A lazy way of sewing, so you don't need to draw a line to sew this...haha! |
 |
PICTURE 16
This is how it will look like. |
 |
PICTURE 17
See the extra fabric there? The one that I've talking about in pic no. 7?
You can now trim off the extra fabric. |
 |
PICTURE 18
Now, we will start sewing the first and last line of that 4 columns as shown. |
 |
PICTURE 19
And it will look like this. |
 |
PICTURE 20
Take both lines that you have sewn just now and bring it to the center... |
 |
PICTURE 21
...like so, and you can iron it to let it sit still.
|
 |
PICTURE 22
Now stitch both end.
This is how it will look like from back view (inside pocket view). |
 |
PICTURE 23
Now fold the line that I showed here on both sides and stitch. |
 |
PICTURE 24
This is how it will look like. Alone. |
 |
PICTURE 25
You can now place the pocket onto the bag body.
Center the pocket and adjust accordingly. |
 |
PICTURE 26
Don't forget to stitch at the center of the pocket to create a divider. |
 |
PICTURE 27
Secure pocket pieces to the bag body piece with a stitch using sewing machine. |
 |
PICTURE 28
This is how it will look like on the bag body. |
 |
PICTURE 29
And this is how it will look like on a finish bag, of course, mine here is not lined yet.
There you have it, a neat bellow pockets...! |
Please read it again and again to get the picture as if you are using Japanese book, okay ;)
Hope I've help you here and if have comments or something that you don't understand, do not hesitate to let me know ya!
Have a nice day and happy holidays to Wilayah Persekutuan residents!


Comments
I'll be linking
Mayya @ Sew Chic and Unique